
Disclaimer: #Sponsored by Bluehost This post is sponsored by Bluehost. All opinions and experiences shared here are my own. I also earn a commission when you sign up through my affiliate link.
It’s been over six years since I started Love, Sofie. My blog feels like a personal diary, and I created it with a purpose: to help you, my readers, navigate through life as I navigate mine, too.
I started this blog during the pandemic. Everything was on lockdown, my family needed another source of income, and I was looking for ways to earn from home. That’s when I discovered blogging.
I remember thinking, “Oh wow, blogging is perfect for me!” I’m an introvert, so I loved the idea that I didn’t need to show my face. I’m also creative and artsy, and I needed an outlet where I could express myself. And that’s where it all started.
But, of course, starting a blog wasn’t as easy as I thought. I had to research almost everything myself, from choosing a theme and designing my website to learning how to code. I watched countless tutorials just to figure out how to build a website and make it look the way I wanted.
It was a lot of work, especially when you’re just starting and have no idea what you’re doing.
But now, things are so much easier! With AI website builders, you can simply describe the website you want in one prompt, and you’ll already have an initial website to work with. You can start from there and make changes according to your liking.
Imagine how helpful this would have been for beginners like me six years ago, especially those who have no idea how to code, design, or even create a website!
That’s why when Bluehost invited me to try their AI Builder, I was more than happy to give it a go. And oh boy, was I amazed at what I was able to create!
So hang tight and see what I was able to make, because you can surely create something like this on your own, too.
And another thing I love about Bluehost is that I’ve been using them as my blog host since I started blogging. One of the reasons I stayed is their excellent customer service. Whenever there’s an error on my website, their support team has helped me fix it. And as someone who manages a blog on her own, having someone to assist you when things go wrong is a big help.
But what exactly is the Bluehost AI Builder?
What Is Bluehost AI Builder?
Six years ago, before AI website builders became widely available, bloggers had to design their websites manually. We had to choose a theme, customize it, arrange the pages, install plugins, and sometimes even learn a little coding just to get the website looking the way we wanted.
But now, we have AI, which makes things a whole lot easier.
With Bluehost AI Builder, you can describe in words what kind of website you would like to create. You can also add your own logo, photos, and inspiration pictures to help the AI understand the design you’re going for.
Within a few minutes, it can create an initial version of your website, which you can then refine using the chat box. So if there’s something you don’t like or you want to change, you can simply tell the AI what you have in mind.
Amazing, right?
Its purpose is to help small businesses and creators build the websites, applications, and tools they need to grow. Whether you’re planning to create a travel website, a fashion blog, or a website for your business, you can describe your idea and let the AI help you get started.
And here’s another thing: it’s $0 to start, and no credit card is required to try it!
I know some people might wonder, if the website is built using AI, what about customer support? Don’t worry! Bluehost offers 24/7 human support, where you can get assistance with your website, domain, and hosting.
Now, let’s talk about some of the features I personally liked about the Bluehost AI Builder.
Key Features of Bluehost AI Builder
1. No credit card required to try building a website
One of the things I appreciate is that you don’t need a credit card to try the AI Builder.
Some websites require you to enter your credit card details before you can try their services. I get it, but sometimes it can be annoying. What if you’re busy and forget to cancel your subscription before the free trial ends? You might end up getting charged without even realizing it.
With Bluehost AI Builder, you can start creating and exploring your website without having to enter your credit card details. I think this is great, especially for beginners who simply want to see what the tool can do before deciding whether to purchase a plan.
2. It asks about your business or what you’re trying to create
Before building your website, the AI will ask you a few questions about what you’re trying to create.
Is it about travel? Fashion? Or perhaps a business?
This helps the AI understand what kind of website you need, so the design is more tailored to your project instead of looking like a generic template that everyone else is using.
You can also upload your own logo, photos, and inspiration pictures to make the website feel more personal.
3. Domain registration, hosting, and AI website creation in one place
Another thing I like is that domain registration, hosting, and AI website creation are all in one place.
When you’re a beginner, navigating different platforms can be confusing. You have to figure out where to register your domain, where to host your website, and how to connect everything.
With Bluehost, you can manage these essentials in one place, using one account. It makes the whole process much simpler because you don’t have to keep switching between different websites and learning how everything works separately.
4. You can grow your website as your business grows
Bluehost AI Builder isn’t just about creating a website and leaving it there. You can build your own website and use your own domain, giving you a place to continue growing your online presence.
As your blog or business grows and you need more features, you can explore the available options instead of thinking that you have to start all over again. Of course, make sure to check the plan details to see which features are available as your needs change.
5. Things are simply easier with Bluehost AI Builder
Six years ago, I built my website from scratch. Yes, I had full control over the end result, but what made it difficult was the setup process.
Choosing themes, designing the website, installing plugins, and navigating hosting dashboards can be overwhelming. And sometimes, these technical things are exactly what stop people from publishing their first blog post.
But with AI, you already have a website ready to work on. You don’t have to figure out every single detail before you can start. You can focus on the design, make a few changes, add your content, and slowly make the website your own.
So, how do you start? No worries, read on, and I’ll guide you through it!
Step-by-Step Tutorial: How to Use Bluehost AI Builder
For this tutorial, I’ll show you how I created my own lifestyle and fashion blog using Bluehost AI Builder.
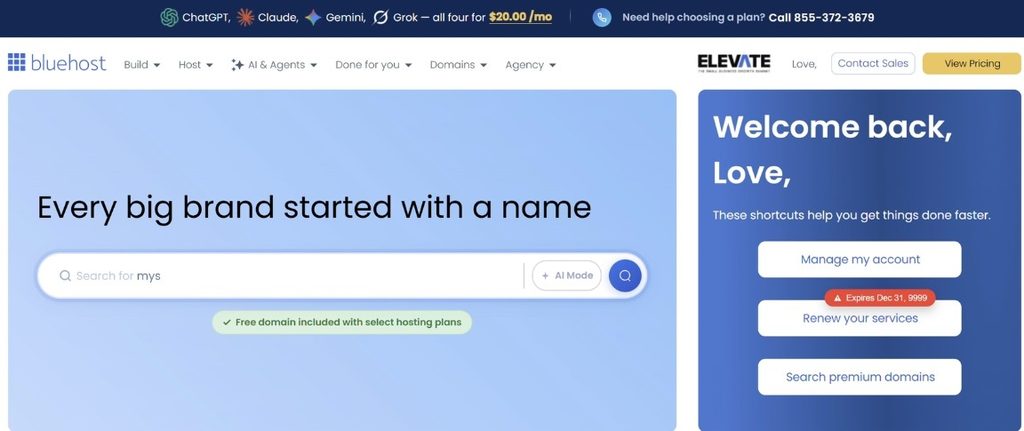
1. Go to Bluehost
First, go to Bluehost.com.
2. Go to AI Builder
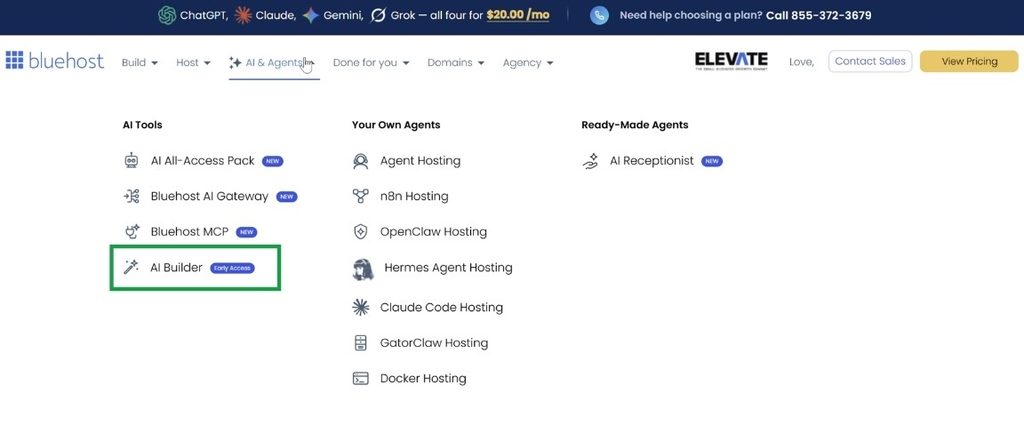
On the top navigation section, click AI & Agents. You’ll see different categories, and under AI Tools, click AI Builder.
3. Input your prompt
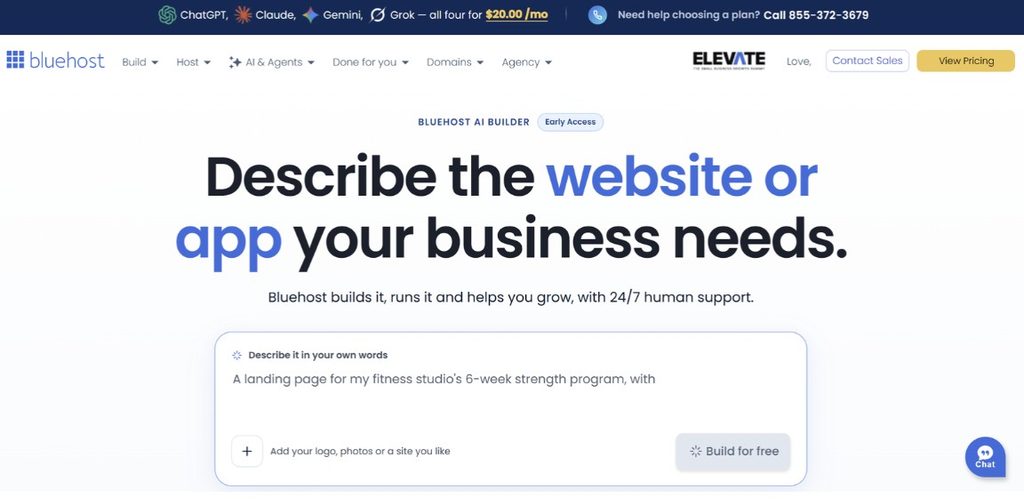
Now, this is where you get to describe the website you want to create!
Before writing your prompt, I suggest preparing these details first. This will help you give the AI a clearer idea of what you want, so you won’t have to make too many changes afterward.
- Website name:
- Color theme:
- Inspiration pictures:
- Logo:
- What is the website about?
In my case, I wanted a lifestyle and fashion blog with a feminine and editorial feel.
Here’s the prompt I used as an example:
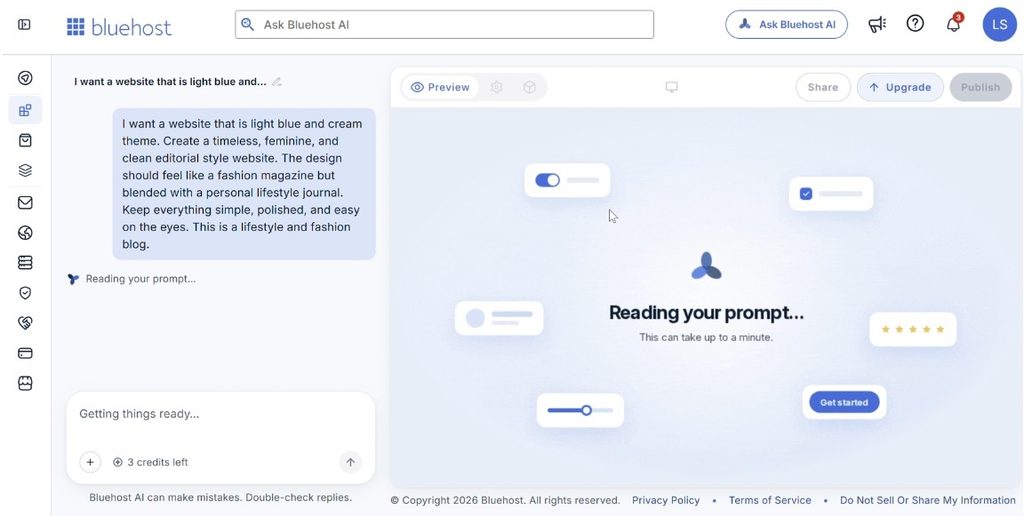
“I want a website that is light blue and cream theme. Create a timeless, feminine, and clean editorial style website. The design should feel like a fashion magazine but blended with a personal lifestyle journal. Keep everything simple, polished, and easy on the eyes. This is a lifestyle and fashion blog.”
I wanted something that looked like a fashion magazine but still had that personal blog feel. I also wanted the colors to be light, clean, and easy on the eyes.
4. Answer the quick questions
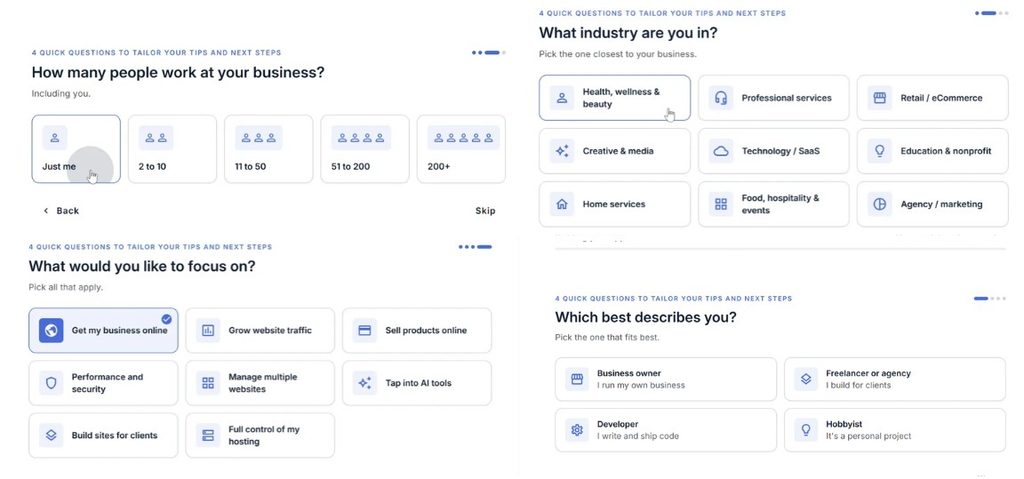
Before Bluehost AI Builder creates your website, it will ask you a few questions first to get to know more about you and your project.
The questions are:
- Which best describes you?
- What industry are you in?
- How many people work at your business?
- What would you like to focus on?
After answering these questions, Bluehost AI Builder will proceed with creating your website.
5. The first draft and refining your website
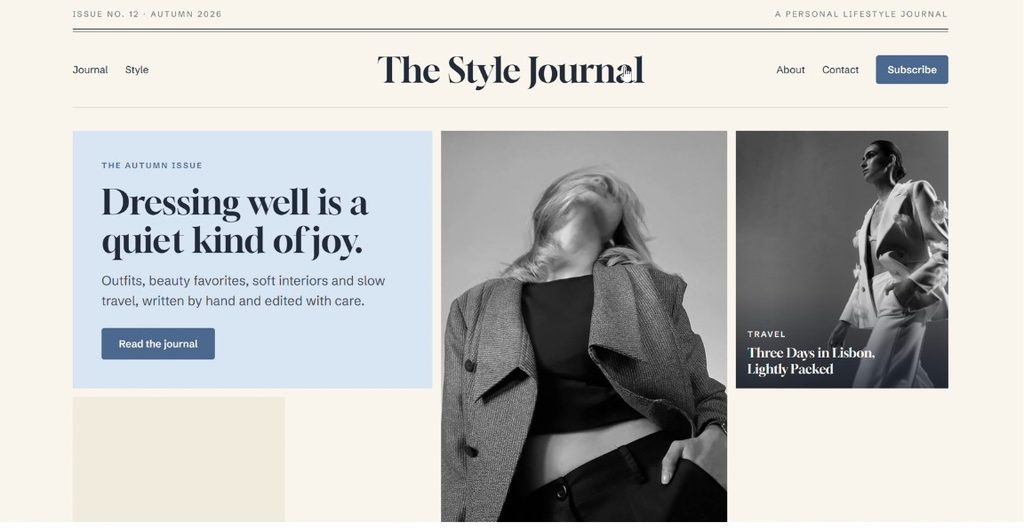
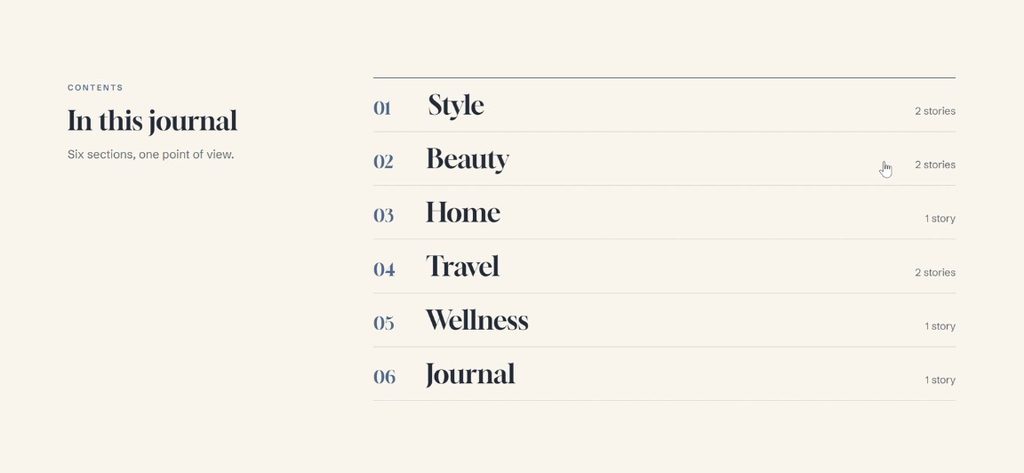
Here’s the first draft that Bluehost AI Builder created!
I was truly amazed at how it followed the color theme I wanted. The light blue and cream combination was there, and the overall vibe felt editorial, which I loved.
But I still felt like something was missing.
I wanted the website to look more like the format of my existing blog. So, on my next prompt, I simply indicated in the chat box, “I want the website to look more like this format.”
Then, I uploaded a screenshot of my own website as a reference.
And that’s it! I let the AI use my existing website as inspiration to refine the design.
6. The final website
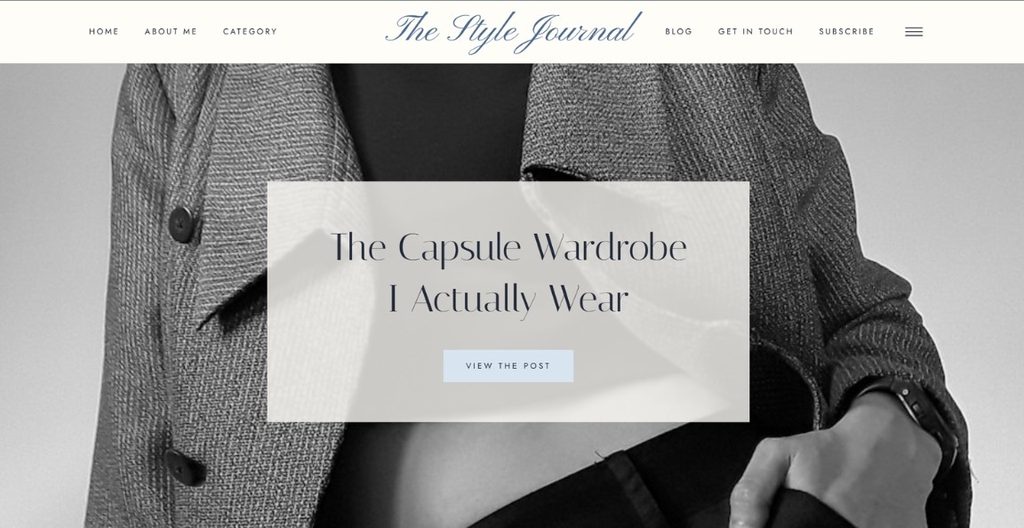
And this is what amazed me!
After that prompt, what came next was much closer to what I had been envisioning. I loved the style and the arrangement of the posts. It finally had the look I wanted for my lifestyle and fashion blog.
Let me show you some of the sections!
The Categories Section
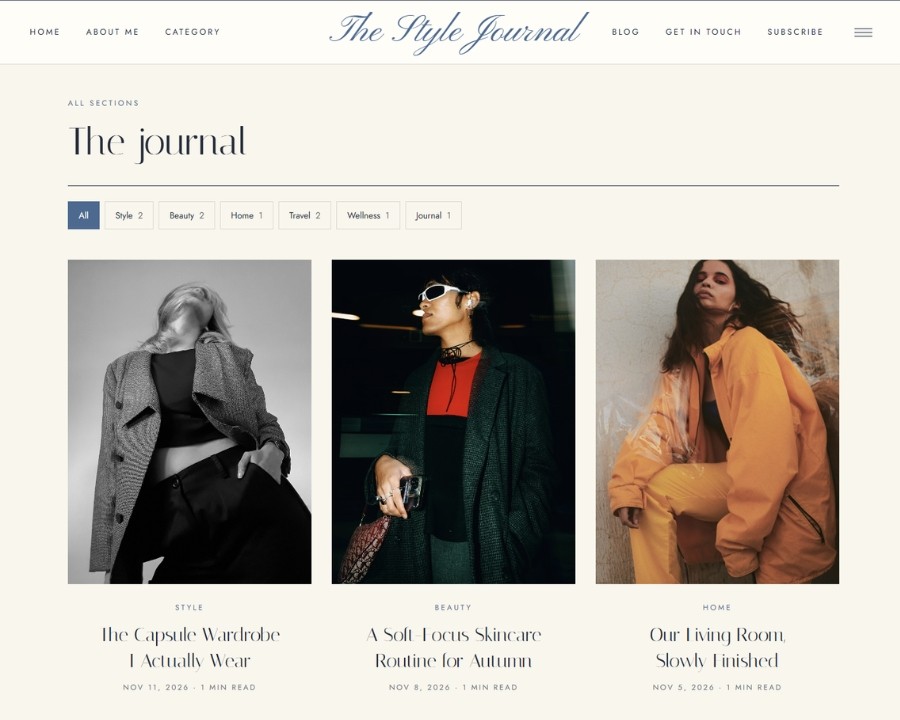
This is what the categories section looks like. I love how everything is neatly organized while still looking classy. It’s simple, and readers can easily browse through the different topics on the blog.
The Subscribe Section
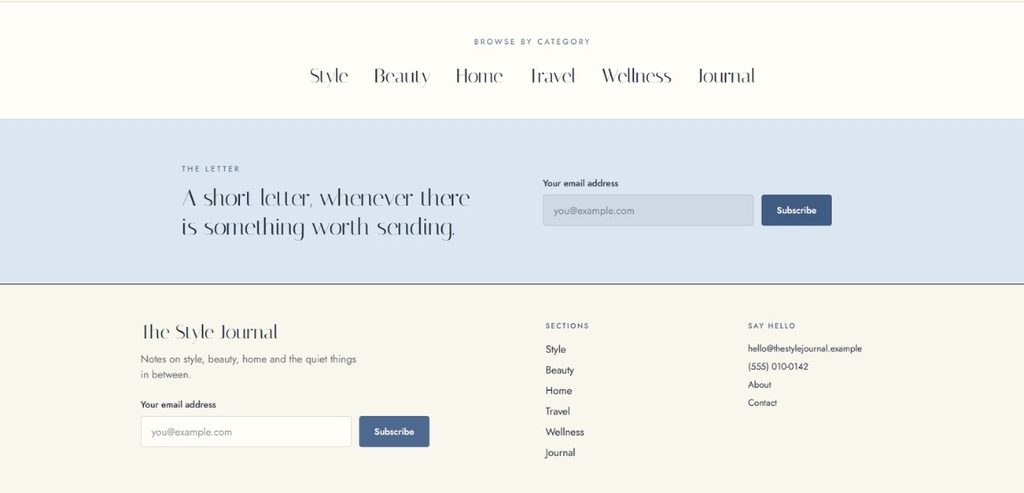
The subscribe section is already there, too! This is where your readers can sign up and stay updated with your latest posts.
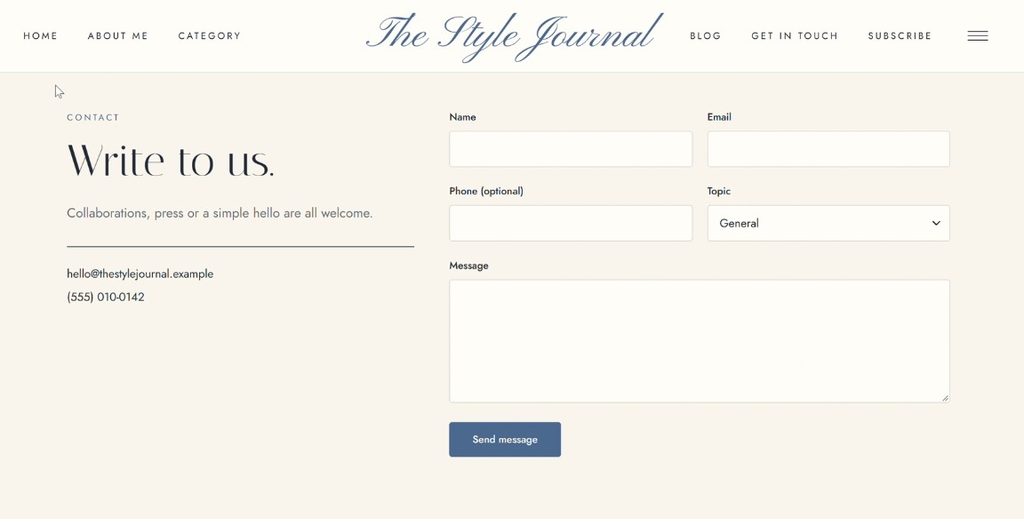
For me, emails from readers saying hello are always welcome. I love hearing from people who take the time to read my blog, so having this section already included is a nice touch.
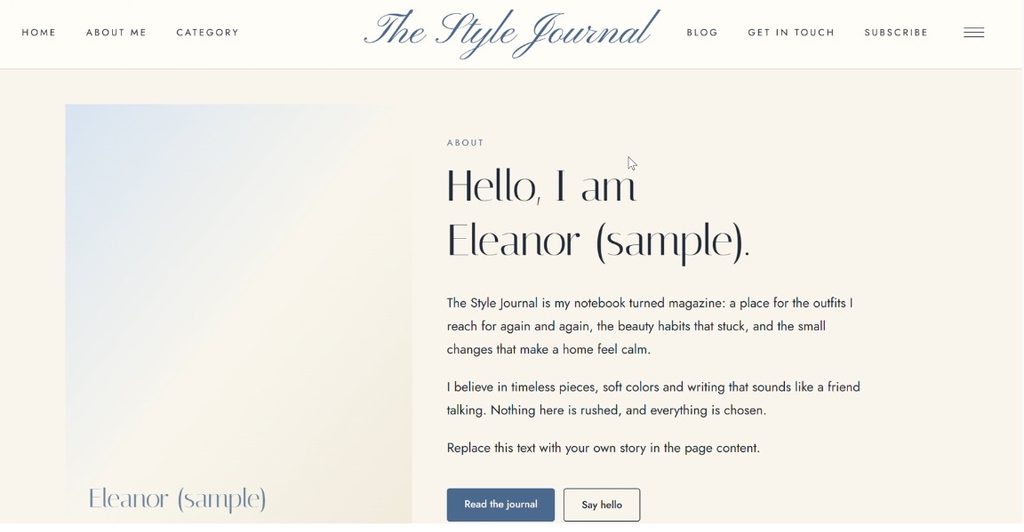
The About Me Section
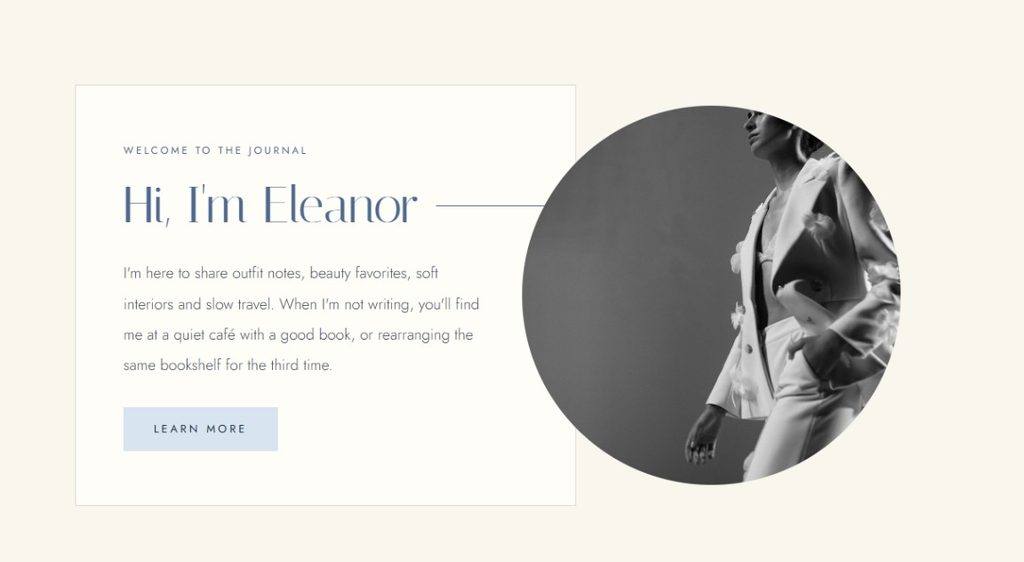
The About Me section is also prepared and ready for customization. You can add your introduction, share a little about yourself, and tell your readers what your website is all about.
I was truly amazed at how everything was already set up. All it takes is a few easy changes to make the website feel more like yours.
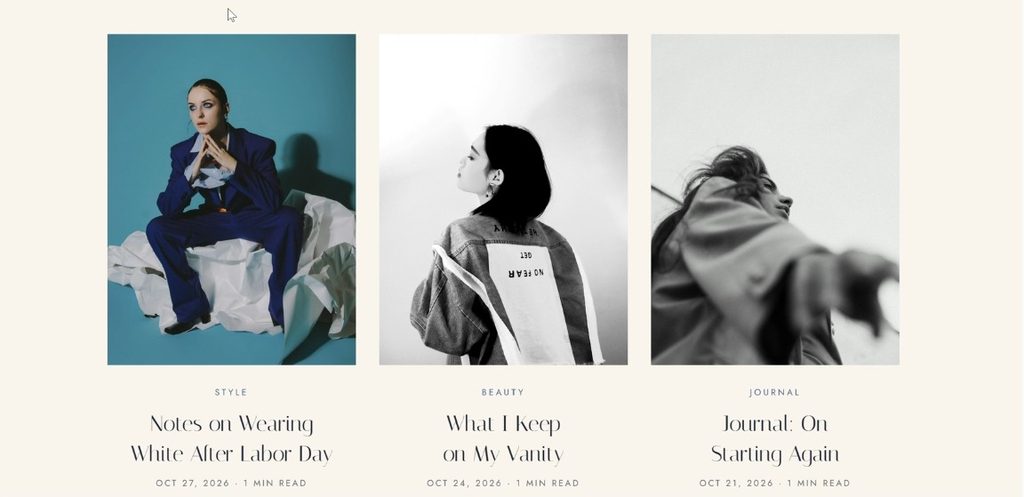
The Recent Posts Section
And here’s what the recent posts section looks like on the homepage. This is where your latest blog posts will appear, making it easier for readers to see what you’ve recently published.
I love how everything is arranged because it makes the homepage look complete without having to design each section manually.
And don’t worry, after publishing, you can still edit your website according to your needs. You can change the text, add your own photos, update your posts, and make other adjustments as you go.
7. Time to publish your website!
After all those changes, I was truly happy with what I had made. It was finally looking the way I wanted, and we’re all set!
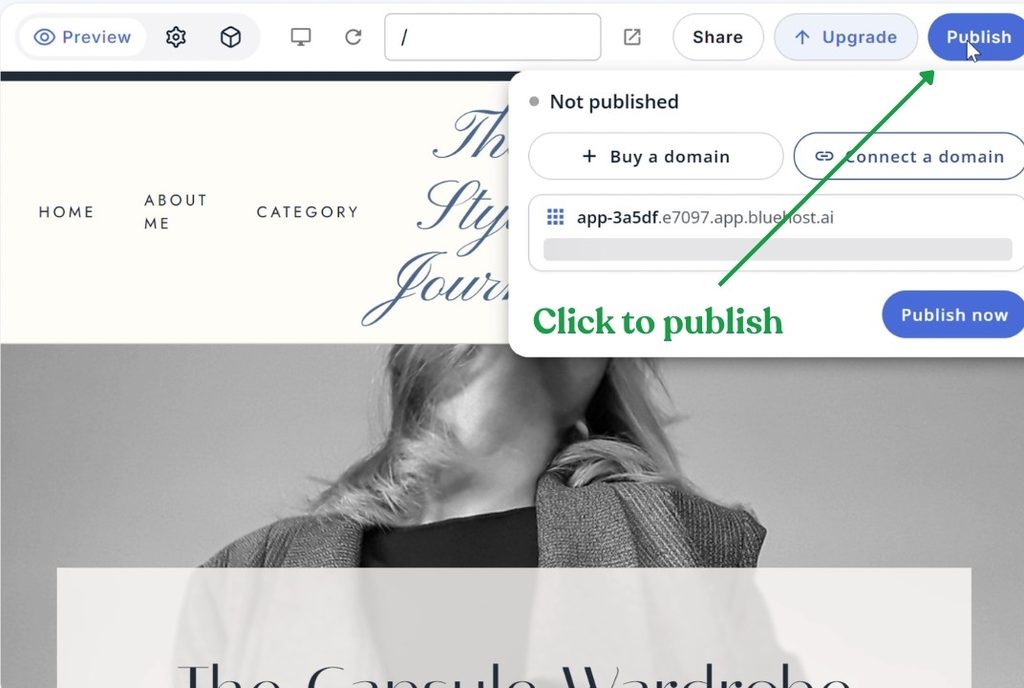
It’s time to publish the website.
After clicking Publish, select Publish Now and wait a few minutes for everything to be finalized.
And voila, you’re done! Easy, right?
Plus, you can try the AI Builder without a credit card or paying anything upfront just to explore the website creation process.
8. What if you don’t have a domain yet?
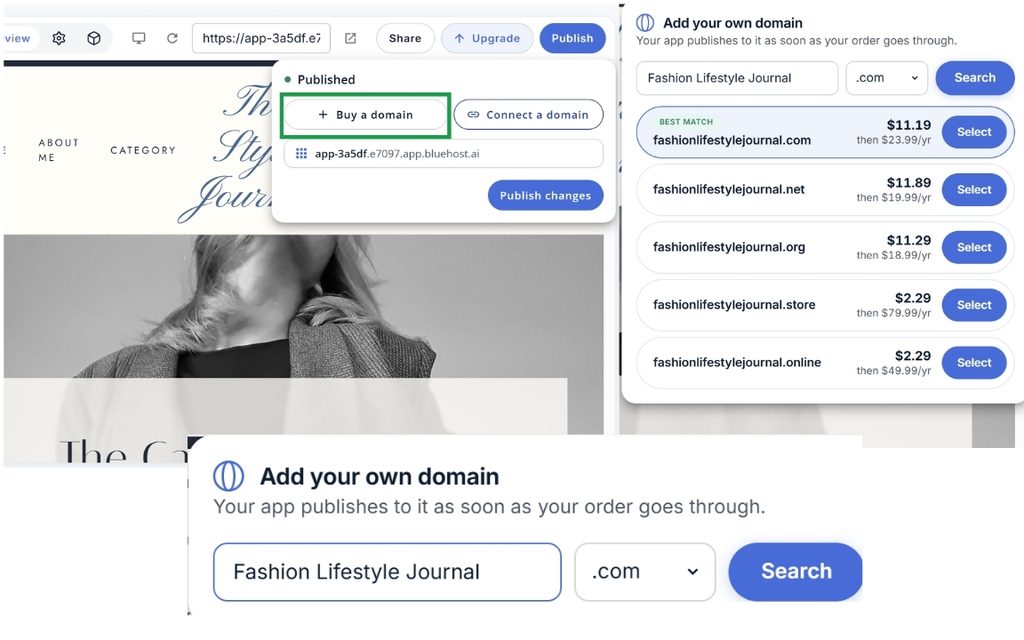
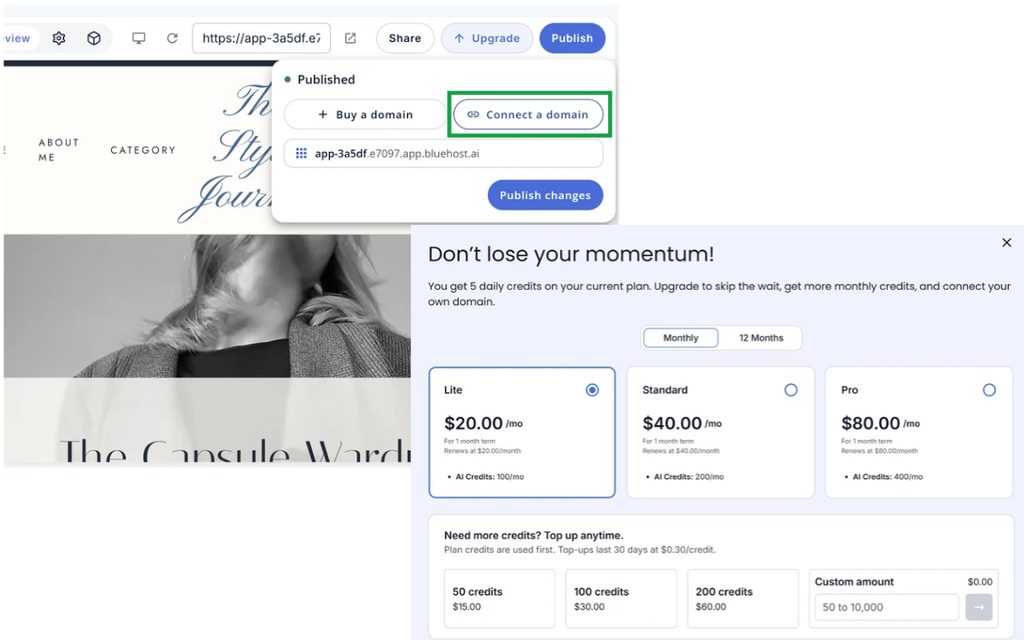
If you don’t have a domain yet, no worries! You can also buy one through Bluehost by clicking Buy a Domain.
If you already have a domain, you can select Connect a Domain to connect it to your website.
You can also explore Bluehost’s paid plans, which start from $20/mo. Just make sure to check the current plan details and inclusions before choosing one.
Final Thoughts: Is Bluehost AI Builder Worth Trying?
Yes! I can definitely say that it’s worth trying.
I was truly surprised by how the AI Builder created a website that was so close to what I had in mind. Initially, I thought it would only create a rough draft, and I would still have to do most of the designing myself. But I was wrong, which is why I was pleasantly surprised with the result.
I can say that this is perfect for beginners, especially those who have been putting off starting a blog because of all the technical things involved.
I know how intimidating it can be when you’re starting from scratch. I experienced it myself six years ago. You have to research everything, watch tutorials, figure out how to design your website, and sometimes spend hours just trying to fix one little thing.
But now, it’s much easier to get started.
To those who have been wanting to create a blog, I think this is your sign! You don’t need to know everything about website design or coding before you begin. You can start with an idea, let the AI help you build the initial website, and make changes along the way.
For me, blogging has always been more than just having a website. It’s a way to express myself, share the things I love, and connect with readers. And I think everyone deserves to have a little space where they can do the same.
So if you’ve been thinking about starting a blog, creating a website for your business, or simply having your own corner on the internet, why not give it a try?
Try Bluehost AI Builder here. It’s $0 to start, and no credit card is required to try building your website.
Who knows? You might end up creating something you absolutely love, just like I did with Love, Sofie.
Love,
Sofie






Leave a Reply